Appearance
卡片样式
对应视图上卡片部分的样式设置,在卡片视图、看板视图、时间线视图中都会使用到卡片样式,我们在这个章节统一讲解。
卡片结构说明
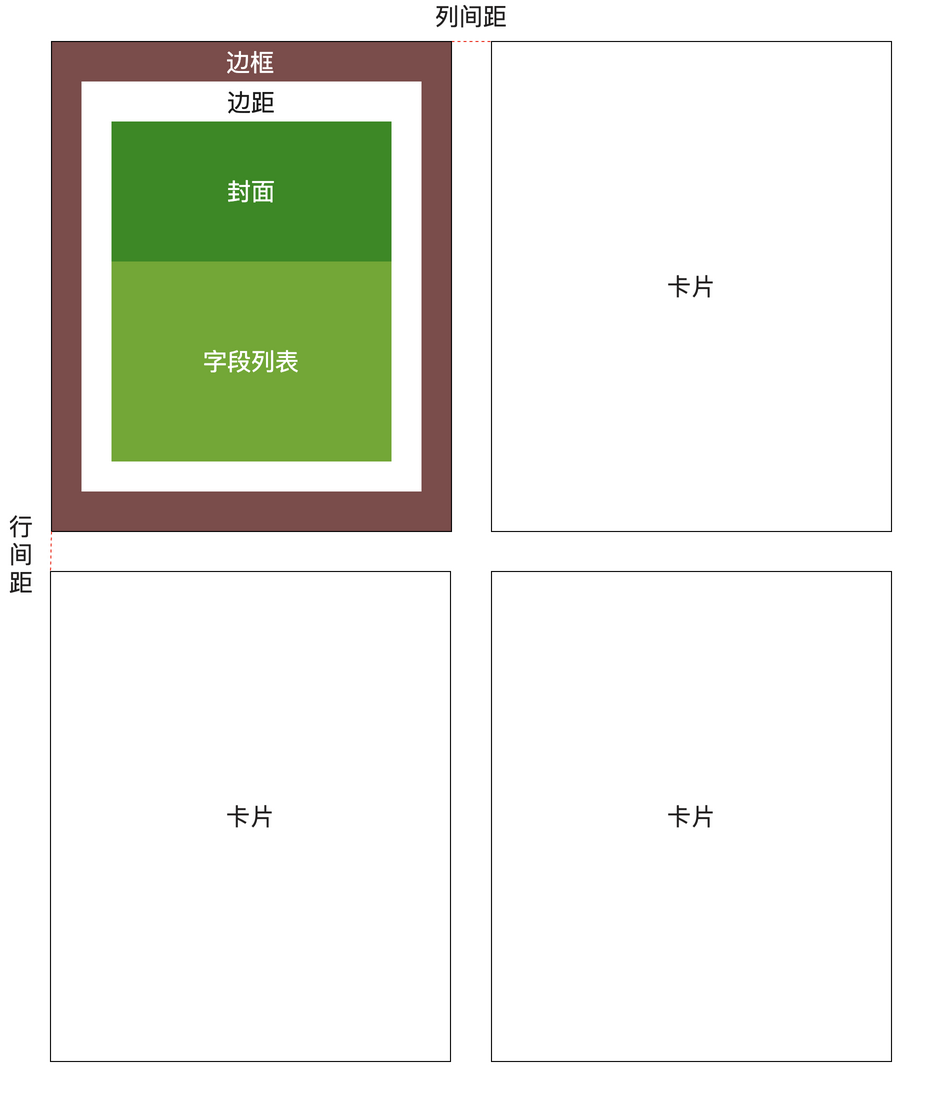
渲染方式
卡片分为默认、富文本、自定义组件三种渲染方式。下文将通过示例的方式演示三种卡片不同的配置方式。
数据表定义
下文的例子都将以任务表作为数据源。以下是具体的数据结构:
| 标识符 | 字段名称 | 字段类型 | 说明 |
|---|---|---|---|
| no | 编号 | 编号 | 编号计算表达式:T${String.lpad(seq,6,'0')} |
| name | 名称 | 单行文本 | 任务的名称 |
| progress | 完成度 | 小数 | |
| state | 状态 | 列表选择 | 选项:未开始、进行中、已取消、已完成 |
| who | 责任人 | 用户选择 | |
| startDate | 开始时间 | 日期 | |
| planStartDate | 预计开始时间 | 日期 | |
| planFinishDate | 预计完成时间 | 日期 | |
| finishDate | 实际完成时间 | 日期 | |
| descs | 任务描述 | 富文本 | 业务字段 |
| docs | 任务文档 | 附件 | 业务字段 |
| taskChildren | 子任务 | 子对象 | 用于构建树形结构 |
状态枚举值
| 选项 | 标识符 |
|---|---|
| 未开始 | unstart |
| 进行中 | progress |
| 已取消 | cancel |
| 已完成 | complete |
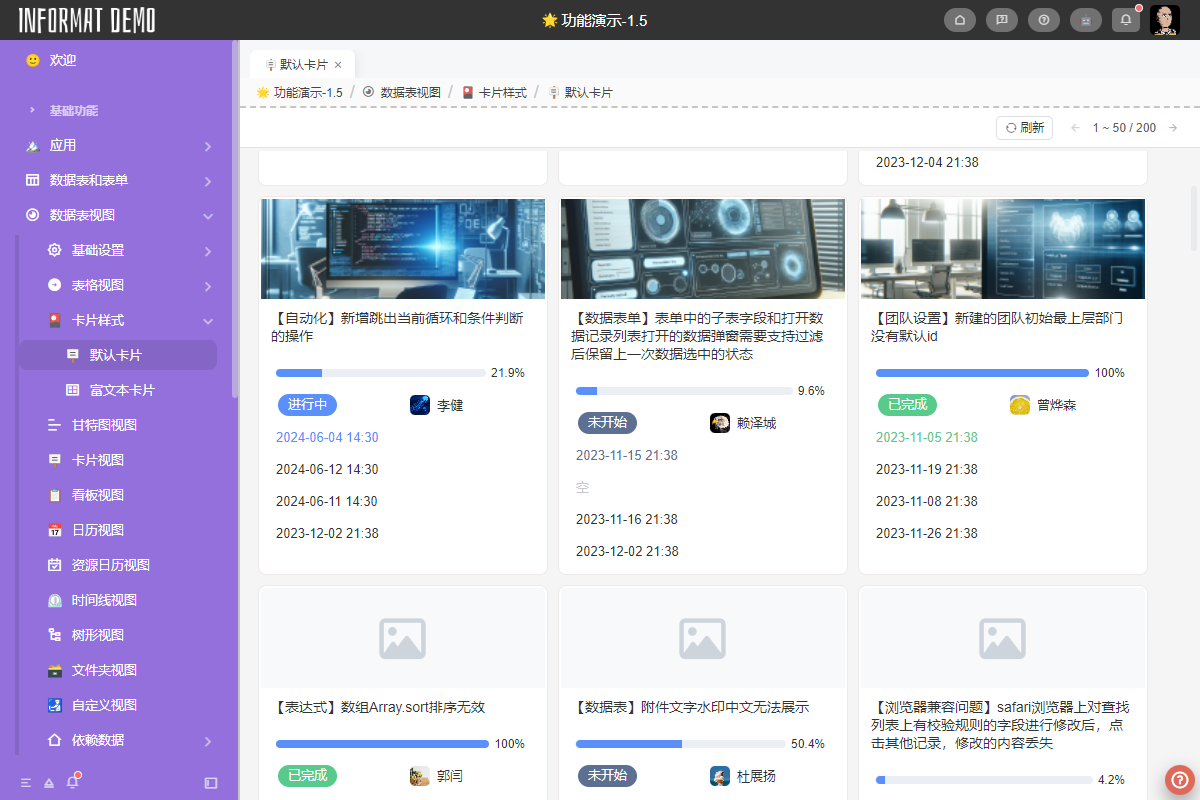
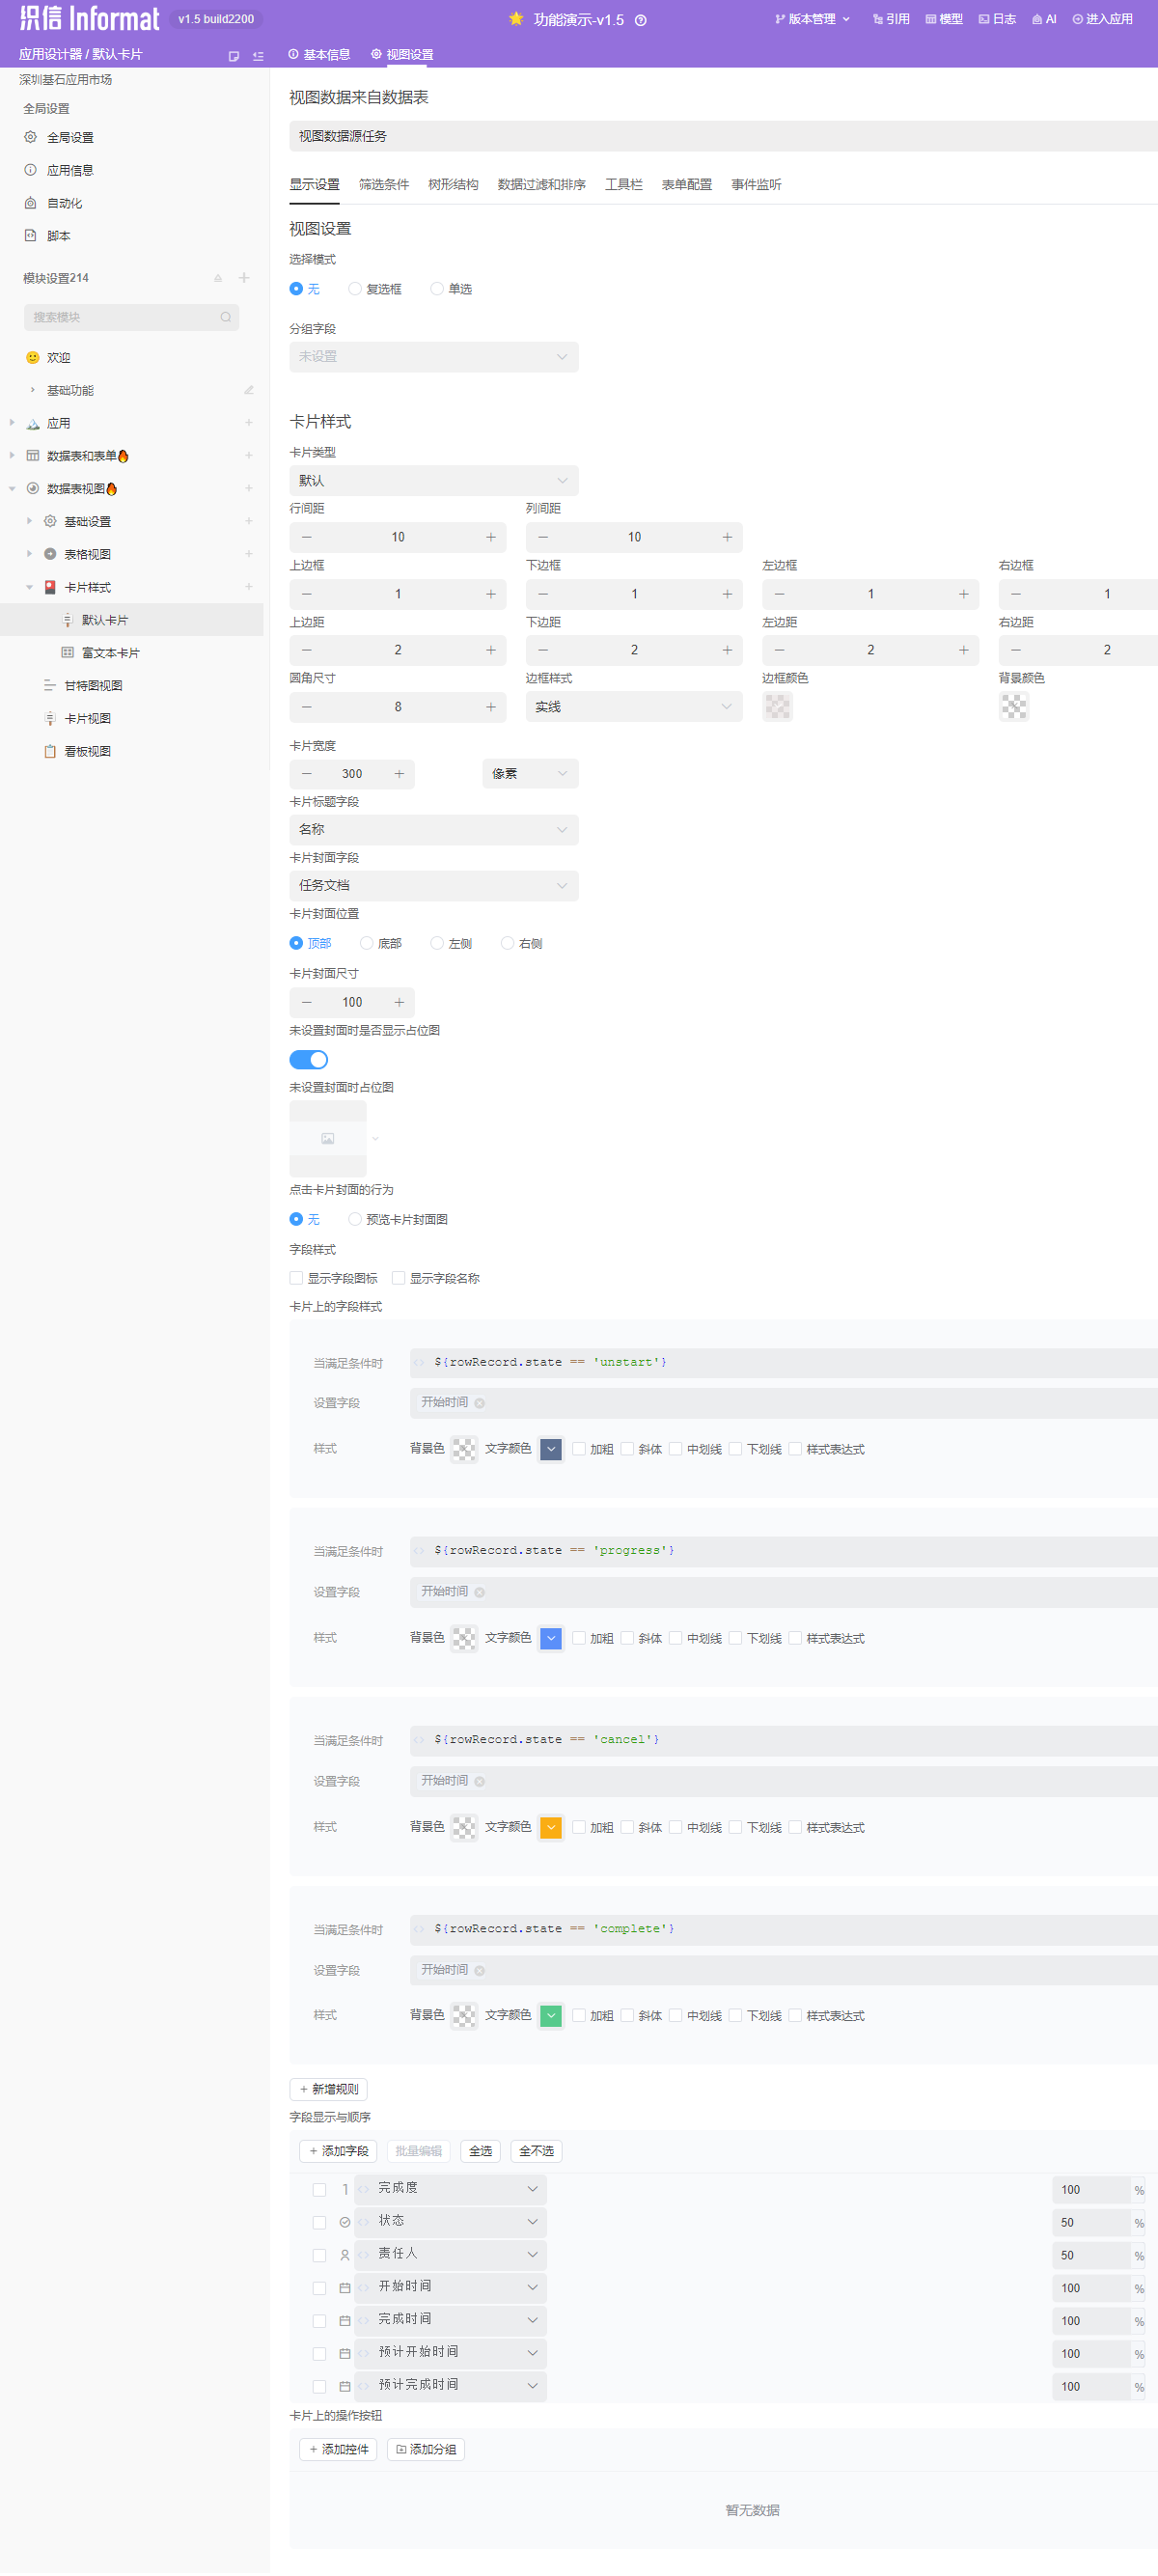
默认
通过简单的系统配置,并使用系统预设的卡片样式进行渲染。
富文本
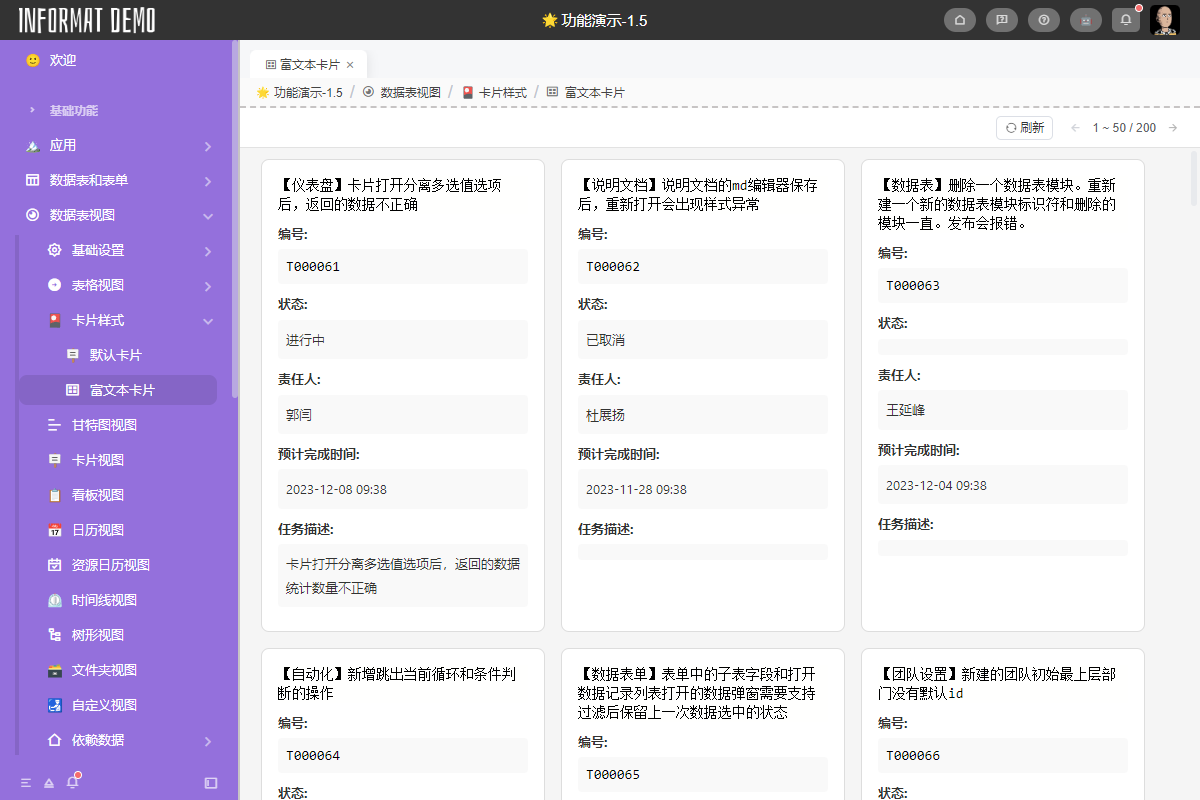
使用富文本编辑器进行自定义渲染,支持富文本的数据绑定方式,下文将通过一个示例讲解富文本卡片的使用,具体富文本相关的知识,请查看相关章节文档。
卡片内容
富文本卡片的内容仅包含卡片内容的定义。卡片的边框、内边距、列间距和行间距等样式需要通过卡片样式进行定义。
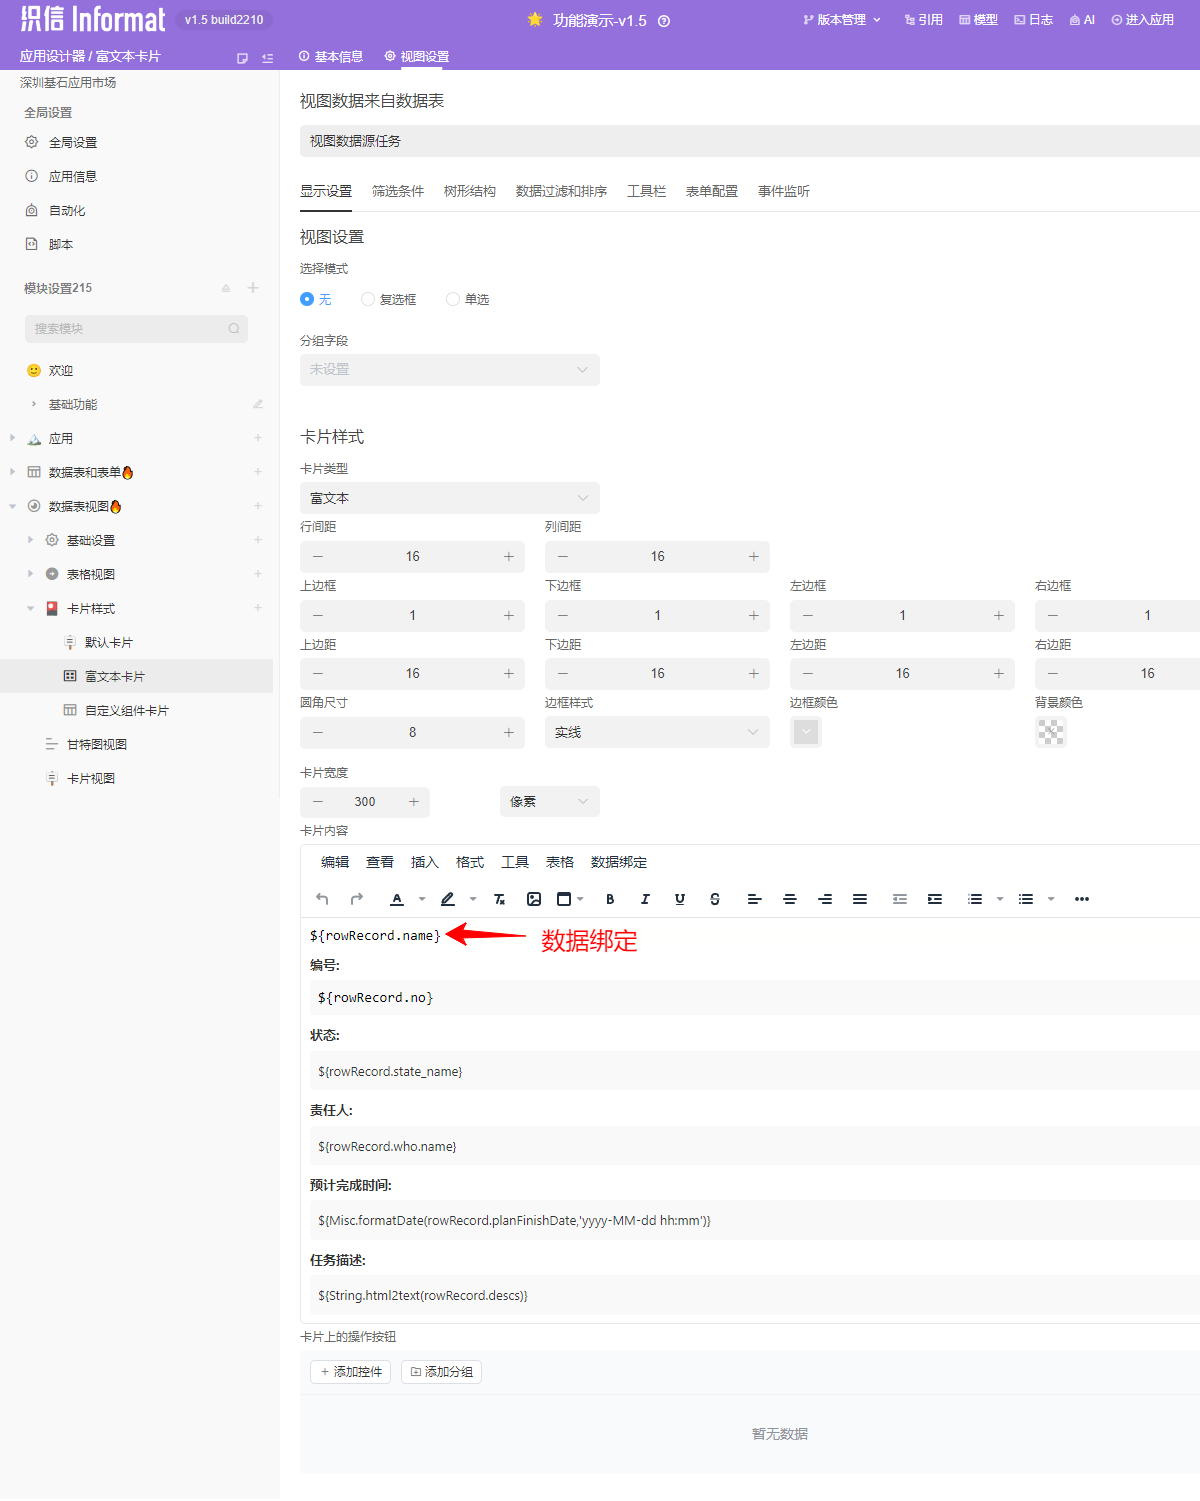
html
<div style="width: 100%;">
    <div style="font-size: 18px; font-weight: bold; margin-bottom: 8px;">
        <div
            style="color: #000000; background-color: #fffffe; font-family: Consolas, 'Courier New', monospace; font-weight: normal; font-size: 14px; line-height: 19px;">
            <div><span style="color: #000000;">${rowRecord.name}</span></div>
        </div>
    </div>
    <div style="margin-bottom: 8px;">
        <label style="display: block; font-weight: bold; margin-bottom: 4px;" for="no">编号:</label>
        <div id="no" style="background-color: #f9f9f9; padding: 8px; border-radius: 4px;">
            <div
                style="color: #000000; font-family: Consolas, 'Courier New', monospace; font-weight: normal; font-size: 14px; line-height: 19px;">
                <div><span style="color: #000000;">${rowRecord.no}</span></div>
            </div>
        </div>
    </div>
    <div style="margin-bottom: 8px;"><label style="display: block; font-weight: bold; margin-bottom: 4px;"
            for="state">状态:</label>
        <div id="state" style="background-color: #f9f9f9; padding: 8px; border-radius: 4px;">${rowRecord.state_name}
        </div>
    </div>
    <div style="margin-bottom: 8px;"><label style="display: block; font-weight: bold; margin-bottom: 4px;"
            for="who">责任人:</label>
        <div id="who" style="background-color: #f9f9f9; padding: 8px; border-radius: 4px;">${rowRecord.who.name}</div>
    </div>
    <div style="margin-bottom: 8px;"><label style="display: block; font-weight: bold; margin-bottom: 4px;"
            for="planFinishDate">预计完成时间:</label>
        <div id="planFinishDate" style="background-color: #f9f9f9; padding: 8px; border-radius: 4px;">
            ${Misc.formatDate(rowRecord.planFinishDate,'yyyy-MM-dd hh:mm')}</div>
    </div>
    <div style="margin-bottom: 8px;"><label style="display: block; font-weight: bold; margin-bottom: 4px;"
            for="descs">任务描述:</label>
        <div id="descs" style="background-color: #f9f9f9; padding: 8px; border-radius: 4px;">
            ${String.html2text(rowRecord.descs)}</div>
    </div>
</div>
1
2
3
4
5
6
7
8
9
10
11
12
13
14
15
16
17
18
19
20
21
22
23
24
25
26
27
28
29
30
31
32
33
34
35
36
2
3
4
5
6
7
8
9
10
11
12
13
14
15
16
17
18
19
20
21
22
23
24
25
26
27
28
29
30
31
32
33
34
35
36
自定义组件
使用组件编辑器进行自定义渲染,支持将当前视图的上下文通过组件参数的方式传递给组件。下文将通过一个示例讲解自定义组件卡片的使用,具体组件编辑器相关的知识,请查看相关章节文档
卡片内容
自定义组件卡片的内容仅包含卡片内容的定义。卡片的边框、内边距、列间距和行间距等样式需要通过卡片样式进行定义。
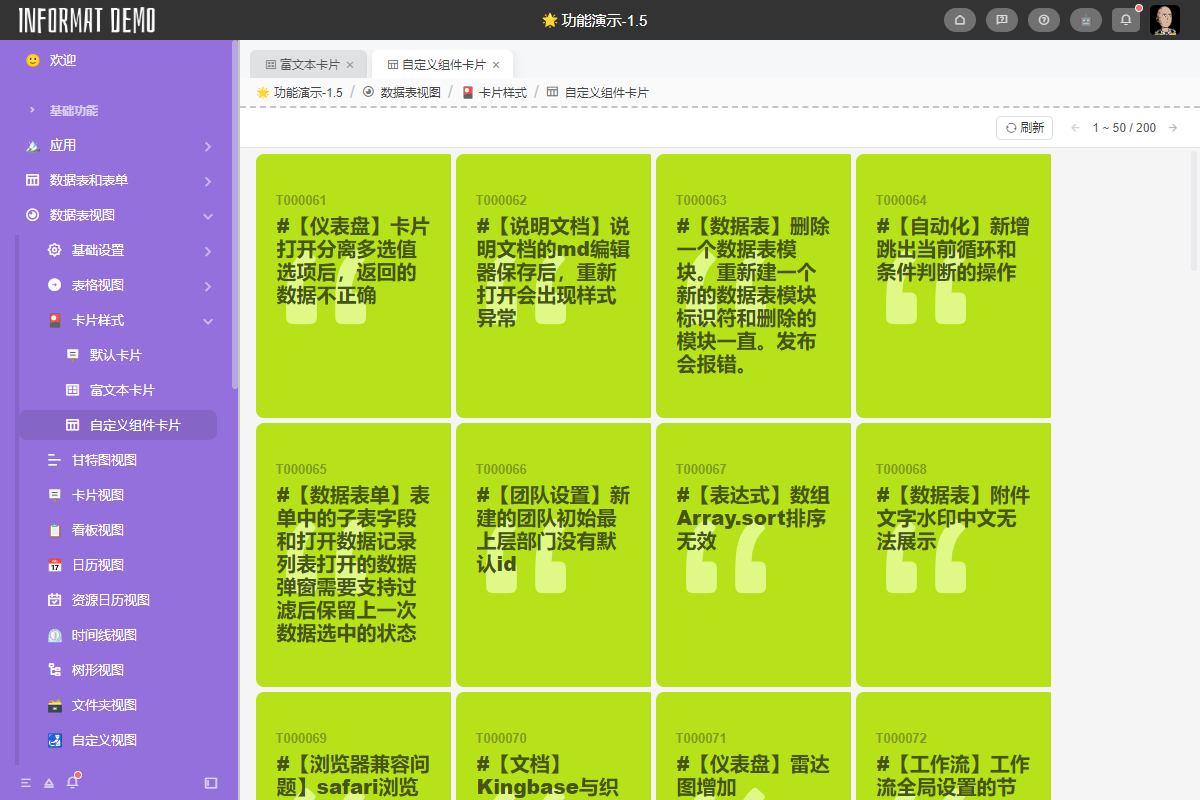
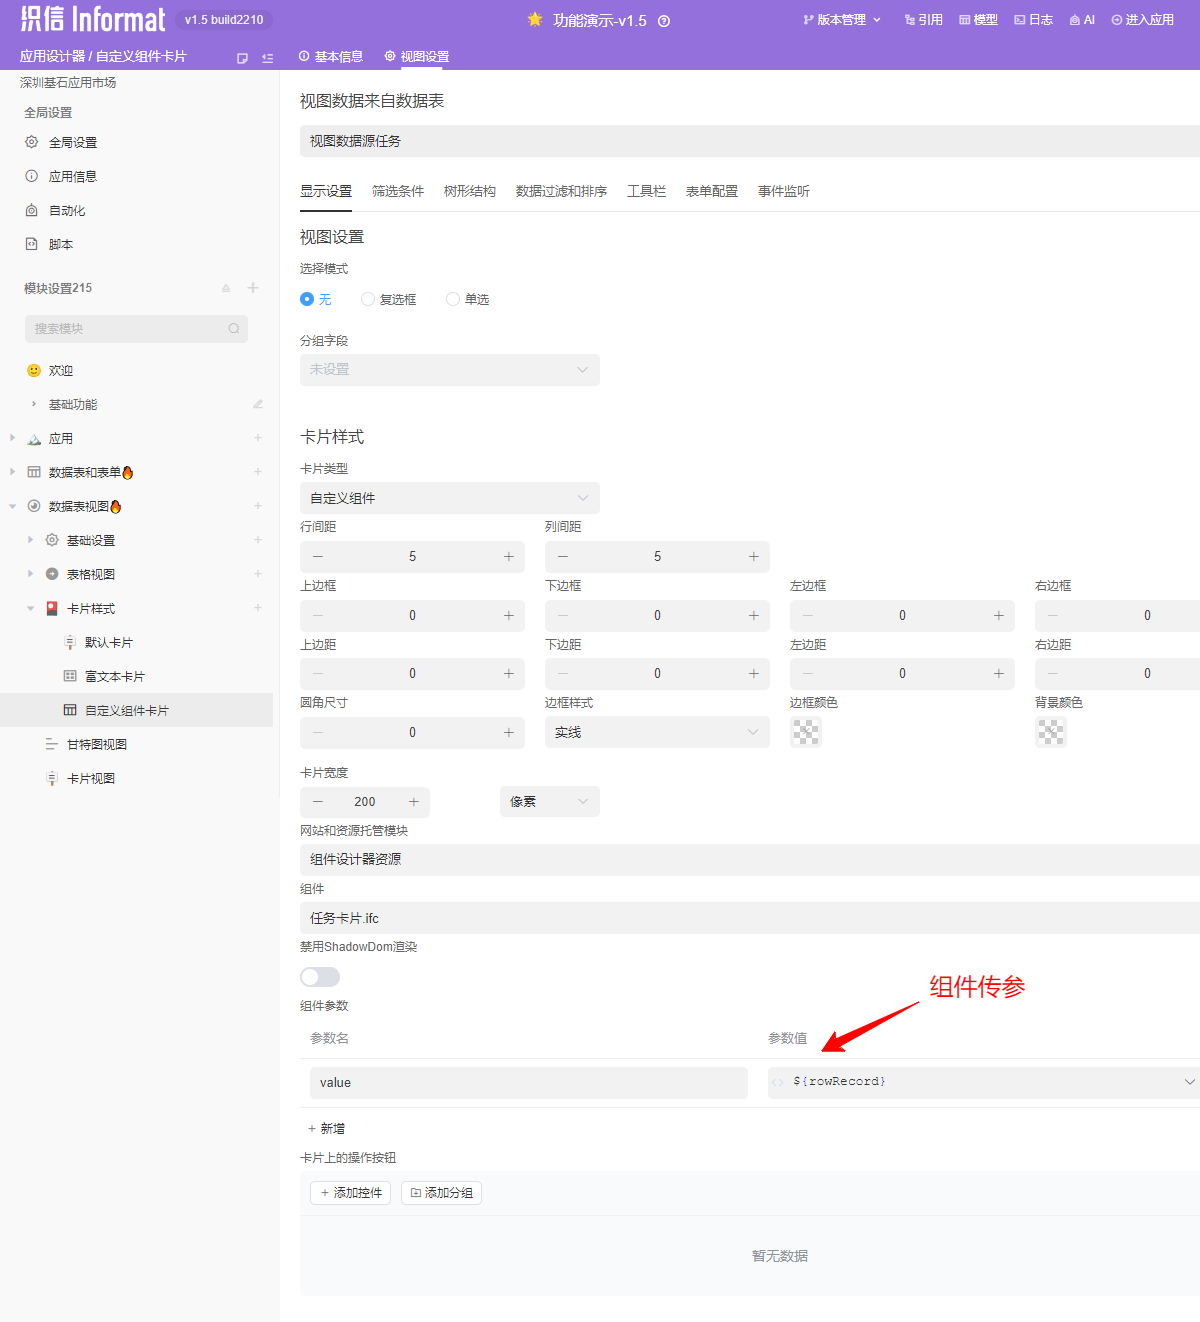
html
<div class="card">
    <div class="card-name">
        {{record.no}}
    </div>
    <div class="quote">
        <svg xmlns="http://www.w3.org/2000/svg" fill="none" viewBox="0 0 330 307" height="80" width="80">
            <path fill="currentColor"
                d="M302.258 176.221C320.678 176.221 329.889 185.432 329.889 203.853V278.764C329.889 297.185 320.678 306.395 302.258 306.395H231.031C212.61 306.395 203.399 297.185 203.399 278.764V203.853C203.399 160.871 207.902 123.415 216.908 91.4858C226.323 59.1472 244.539 30.902 271.556 6.75027C280.562 -1.02739 288.135 -2.05076 294.275 3.68014L321.906 29.4692C328.047 35.2001 326.614 42.1591 317.608 50.3461C303.69 62.6266 292.228 80.4334 283.223 103.766C274.626 126.69 270.328 150.842 270.328 176.221H302.258ZM99.629 176.221C118.05 176.221 127.26 185.432 127.26 203.853V278.764C127.26 297.185 118.05 306.395 99.629 306.395H28.402C9.98126 306.395 0.770874 297.185 0.770874 278.764V203.853C0.770874 160.871 5.27373 123.415 14.2794 91.4858C23.6945 59.1472 41.9106 30.902 68.9277 6.75027C77.9335 -1.02739 85.5064 -2.05076 91.6467 3.68014L119.278 29.4692C125.418 35.2001 123.985 42.1591 114.98 50.3461C101.062 62.6266 89.6 80.4334 80.5942 103.766C71.9979 126.69 67.6997 150.842 67.6997 176.221H99.629Z">
            </path>
        </svg>
    </div>
    <div class="body-text">
        #{{record.name}}
    </div>
    <div class="author">
        <span>
            {{record.createdTime|informat-date-format("yyyy-MM-dd HH:mm")}}
        </span>
    </div>
</div>
1
2
3
4
5
6
7
8
9
10
11
12
13
14
15
16
17
18
19
20
2
3
4
5
6
7
8
9
10
11
12
13
14
15
16
17
18
19
20
css
.card {
  width: 200px;
  height: 264px;
  background: rgb(183, 226, 25);
  font-family: inherit;
  position: relative;
  border-radius: 8px;
}

.quote {
  color: rgb(223, 248, 134);
  padding-left: 30px;
  position: relative;
}

.card-name {
  text-transform: uppercase;
  font-weight: 700;
  color: rgb(127, 155, 29);
  padding: 35px 20px;
  line-height: 23px;
}

.body-text {
  font-size: 20px;
  font-weight: 900;
  padding: 20px;
  color: #465512;
  position: absolute;
  top: 40px;
  left: 1px;
  line-height: 23px;
}

.author {
  margin-top: 5px;
  opacity: 0;
  transition: 0.5s;
}

.card:hover .author {
  opacity: 1;
}

.pic {
  width: 50px;
  height: 50px;
  background-color: rgb(158, 196, 21);
  border-radius: 50%;
}

.author-container {
  display: flex;
  align-items: center;
}

.author {
  font-weight: 700;
  color: rgb(127, 155, 29);
  padding-left: 30px;
}

.card .author svg {
  display: inline;
  font-size: 12px;
  color: rgba(128, 155, 29, 0.452);
}
1
2
3
4
5
6
7
8
9
10
11
12
13
14
15
16
17
18
19
20
21
22
23
24
25
26
27
28
29
30
31
32
33
34
35
36
37
38
39
40
41
42
43
44
45
46
47
48
49
50
51
52
53
54
55
56
57
58
59
60
61
62
63
64
65
66
67
2
3
4
5
6
7
8
9
10
11
12
13
14
15
16
17
18
19
20
21
22
23
24
25
26
27
28
29
30
31
32
33
34
35
36
37
38
39
40
41
42
43
44
45
46
47
48
49
50
51
52
53
54
55
56
57
58
59
60
61
62
63
64
65
66
67
js
export default{
    props:{
        value:{
            type:Object
        }
    },
    data(){
        return{
            record:{
                'name':'name',
                'createdTime':new Date(),
                'no':'000001',
                'state':'未开始'
            }
        }
    },
    watch:{
        value:{
            handler(val){
                if(val){
                    this.record=Object.assign({},val)
                }
            },
            immediate: true
        }
    }
}
1
2
3
4
5
6
7
8
9
10
11
12
13
14
15
16
17
18
19
20
21
22
23
24
25
26
27
2
3
4
5
6
7
8
9
10
11
12
13
14
15
16
17
18
19
20
21
22
23
24
25
26
27

