Appearance
多容器部署
Docker k8s部署需要把各个组件都独立打包成镜像,以下是每个组件的打包方法。
数据库
需要注意,数据库建议安装在宿主机上,如果需要安装在容器内,需要注意数据盘的挂载,否则可能会造成数据丢失,如果docker版本低于20.10.6,启动时需要添加--privileged=true选项以特权模式启动。
shell
$ docker pull postgres:13.11
$ mkdir -p /data/pgsql-13/data
$ docker run --name postgres-13.11 -p 5432:5432 -e POSTGRES_PASSWORD={password} -d -v /data/pgsql-13/data:/var/lib/postgresql/data postgres:13.11安装数据库后,需要初始化数据库:
下载安装包
shell
$ wget https://repo.informat.cn/downloads/packages/informat_next_2.26.zip
$ 解压
$ unzip informat_next_2.26.zip下载执行初始化数据库的脚本
执行脚本需放在db文件夹的同一层级目录
shell
$ wget https://repo.informat.cn/downloads/installer/k8s/db/install_db.sh数据库执行脚本与sql的目录层级为
shell
├── install_db.sh                       # 脚本文件
├── db                                  # SQL 文件存放的文件夹
│   ├── db_informat2_account_prd_init.sql
│   ├── db_informat2_account_prd_init2.sql
│   ├── db_informat2_biz_prd_0_init.sql
│   ├── db_informat2_biz_prd_0_init2.sql
│   └── version
│       ├── 2_account.sql
│       ├── 2_biz.sql
│       ├── 3_account.sql
│       ├── 3_biz.sql
│ └── ...配置脚本
shell
$ vim install_db.sh
IP=127.0.0.1 # 替换为您的数据库IP
PORT=5432 # 替换为您的数据库端口
USERNAME=postgres # 替换为您的用户名
export PGPASSWORD="12345678" # 替换为用户密码
...执行初始化数据库
bash
$ chmod +x install_db.sh
$ ./install_db.shRedis缓存
shell
$ docker pull redis:7.0.5
$ docker run -itd --name redis -p 6379:6379 redis:7.0.5 --requirepass {password}消息队列
shell
# 拉镜像
$ docker pull rabbitmq:3.9.19
$ docker run -d --hostname informat --name rabbit -p 5672:5672 -p 15672:15672 -e RABBITMQ_DEFAULT_USER={user} -e RABBITMQ_DEFAULT_PASS={password} rabbitmq:3.9.19
# 进入容器
$ docker exec -it rabbit /bin/bash
# 开启rabbit管理后台
$ rabbitmq-plugins enable rabbitmq_managementOnlyOffice文件预览
下载镜像
shell
wget https://repo.informat.cn/downloads/installer/k8s/onlyoffice/onlyoffice-7.1.1.tar导入镜像
shell
$ docker load < onlyoffice-7.1.1.tar启动服务
shell
docker run --restart=always --name onlyoffice -p 9002:9002 -v /data/onlyoffice:/data -e JWT_ENABLED=false onlyoffice:7.1.1S3文件存储
shell
$ docker pull minio/minio
$ docker run -d -p 19001:19001 -p 19000:19000 --name minio \
-e "MINIO_ACCESS_KEY=admin" \
-e "MINIO_SECRET_KEY={password}" \
-v {minio挂载路径}/minio/data:/data \
-v {minio挂载路径}/minio/config:/root/.minio \
minio/minio server /data \
--console-address ":19001" --address ":19000"通过上面参数安装后,可以通过对应的http://ip:19001访问minio主页,输入上面的账号名(MINIO_ACCESS_KEY)、密码(MINIO_SECRET_KEY)后,在Buckets菜单中创建新的存储桶
informat-account
下载镜像包
$ wget https://repo.informat.cn/downloads/installer/k8s/informat-next/informat-account-2.26.tar导入镜像
shell
$ docker load < informat-account-2.26.taraccount容器启动示例:
shell
$ mkdir -p /data/informat-account
$ docker run -d --name informat-account \
-p 9881:9881 \
-v /etc/machine-id:/host-machine-id:ro \
-v /sys/class/dmi/id/product_uuid:/host-product-uuid:ro \
-v /data/informat-account:/data cornerstone365/informat-account:2.26TIP
- -p 9881:9881 9881是account服务端口
- -v /data/informat-account:/data 左边的/data/informat-account是指宿主机的数据存储路径,可以根据实际情况修改
account服务参数配置
shell
$ vim /data/informat-account/informat-next/instance/informat-account/application.yml
...
spring:
  application:
    serverId: informat2-account-prd  #如果有多个account实例,则需要保证唯一
    intranetUrl: http://127.0.0.1:19881/ #替换为nginx所在服务器内网ip
  datasource:
    druid:
      url: jdbc:postgresql://127.0.0.1:5432/db_informat2_account_prd?prepareThreshold=0 # 替换的数据库IP和端口
      username: postgres # 替换数据库用户名
      password: 12345678 # 替换数据库登陆密码
  redis:
    database: 0
    host: 127.0.0.1 # 替换redis服务IP
    port: 6379 # 替换redis服务端口
    password: 12345678 # 替换redis登陆密码
  rabbitmq:
    host: 127.0.0.1 # 替换rabbitmq服务IP
    port: 5672 # 替换rabbitmq服务端口
    nickname: Informat-Next
    username: admin # 替换rabbitmq服务用户名
    password: 12345678 # 替换rabbitmq服务用户密码
...
# 保存后重启服务
$ docker restart informat-accountinformat-biz
下载镜像包
$ wget https://repo.informat.cn/downloads/installer/k8s/informat-next/informat-biz-2.26.tar导入镜像
shell
docker load < informat-biz-2.26.tarbiz容器启动示例:
shell
$ mkdir -p /data/informat-biz
$ docker run -d --name informat-biz \
-p 8881:8881 \
-v /etc/machine-id:/host-machine-id:ro \
-v /sys/class/dmi/id/product_uuid:/host-product-uuid:ro \
-v /data/informat-biz:/data cornerstone365/informat-biz:2.26TIP
- -p 8881:8881 8881是biz服务端口
- -v /data/informat-biz:/data 左边的/data/informat-biz是指宿主机的数据存储路径,可以根据实际情况修改
biz服务参数配置
shell
$ vim /data/informat-biz/informat-next/instance/informat-biz/application.yml
$ vim application.yml
...
spring:
  application:
    serverId: informat2-biz-prd  #如果有多个biz实例,则需要保证唯一
    intranetUrl: http://127.0.0.1:19881/ #替换为nginx所在服务器内网ip
  datasource:
    druid:
      url: jdbc:postgresql://127.0.0.1:5432/db_informat2_biz_prd_0?prepareThreshold=0 # 替换的数据库IP和端口
      username: postgres # 替换数据库用户名
      password: 12345678 # 替换数据库登陆密码
  redis:
    database: 0
    host: 127.0.0.1 # 替换redis服务IP
    port: 6379 # 替换redis服务端口
    password: 12345678 # 替换redis登陆密码
  rabbitmq:
    host: 127.0.0.1 # 替换rabbitmq服务IP
    port: 5672 # 替换rabbitmq服务端口
    nickname: Informat-Next
    username: admin # 替换rabbitmq服务用户名
    password: 12345678 # 替换rabbitmq服务用户密码
...
# 保存后重启服务
$ docker restart informat-bizNginx
shell
# 拉取镜像
$ docker pull nginx
$ docker run --name nginx -p 80:80 -p 19881:19881 -d nginx下载配置文件
shell
$ wget https://repo.informat.cn/downloads/installer/k8s/nginx/informat-next.conf修改配置
shell
vi informat-next.conf

upstream backend_account {
  hash $proxy_add_x_forwarded_for;
  server 172.17.0.1:9881; # 修改为informat-account所在服务器ip
  server 172.17.0.2:9881;
}

upstream backend_biz_s0 {
  hash $proxy_add_x_forwarded_for;
  server 172.17.0.3:8881; # 修改为informat-biz所在服务器ip
  server 172.17.0.4:8881;
}部署配置文件
将informat-next.conf复制到/etc/nginx/conf.d目录
shell
$ docker cp informat-next.conf nginx:/etc/nginx/conf.d删除默认配置
shell
$ docker exec -it nginx /bin/bash     #进入容器
$ rm /etc/nginx/conf.d/default.conf重启nginx
shell
docker restart nginx重启informat-biz
shell
docker restart informat-biz查看informat-biz日志
shell
tail -f /data/informat-biz/informat-next/log/informat-biz.log修改后台配置项
配置首页地址
打开「系统信息 >> 参数设置」,找到「登陆和资源」
修改首页地址为: http://外网ip/

配置文件预览服务
打开「系统信息 >> 参数设置」,找到「文件预览服务」
修改office文件预览地址为: http://外网ip:9002

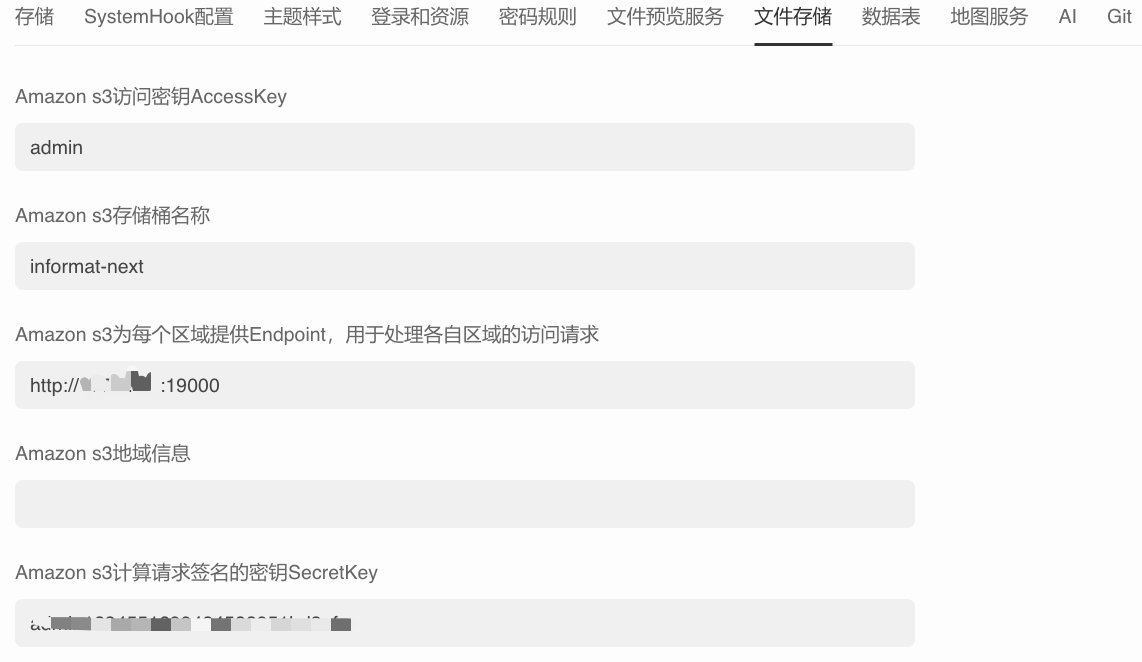
配置文件存储
登录minio:http://外网ip:19001
添加存储桶:informat-next
打开「系统信息 >> 参数设置」,找到「文件存储」

- 填入创建minio时的AccessKey和SecretKey
- 填入刚刚添加的存储童名称:informat-next
- 修改endpoint地址为:http://minio容器内ip:19000
配置Node服务
打开「系统信息 >> 参数设置」,找到「Node」

修改NODE命令行为:/usr/local/bin/node
修改node模块路径为:/
配置Git服务
打开「系统信息 >> 参数设置」,找到「Git」

修改Git命令路径为:/usr/bin/git
常见问题
*** 如何知道服务启动完成? ***
第一次启动会比较慢,可以通过查看/data/informat-biz/informat-next/log/informat-biz.log 查看织信服务已经启动完成 访问首页http://服务器ip可以正常访问
*** 如何查看织信日志 ***
织信account服务运行实例的日志在/data/informat-account/informat-next/log目录下
织信biz服务运行实例的日志在/data/informat-biz/informat-next/log目录下\
*** 如何重启容器 ***
shell
$ docker start informat-account
$ docker start informat-biz
