Appearance
Ceph安装
概述
ceph-nano由 Ceph 和容器技术驱动,内部运行一个 Ceph 容器并暴露一个 Rados 网关,通过提供一个兼容 REST 的 S3 网关,帮助开发者与 S3 API 进行交互。
文件共享存储如果不使用MinIO的话,可以使用Ceph作为其平替。
安装ceph-nano
先决条件
在安装ceph-nano之前,需要确保您的服务器上安装了docker。
WARNING
该方式安装的s3服务器,其文件目录在容器中。如果需要将文件目录挂载在宿主机,请参考进阶使用
安装cn
- Linux amd64
bash
[root@localhost ~]curl -L https://github.com/ceph/cn/releases/download/v2.3.1/cn-v2.3.1-linux-amd64 -o cn && chmod +x cn- Linux arm64
bash
[root@localhost ~]curl -L https://github.com/ceph/cn/releases/download/v2.3.1/cn-v2.3.1-linux-arm64 -o cn && chmod +x cn测试安装是否成功
bash
[root@localhost ~]./cn
Ceph Nano - One step S3 in container with Ceph.

                  *(((((((((((((
                (((((((((((((((((((
              ((((((((*     ,(((((((*
             ((((((             ((((((
            *((((,               ,((((/
            ((((,     ((((((/     *((((
            ((((     (((((((((     ((((
            /(((     (((((((((     ((((
             (((.     (((((((     /(((/
              (((                *((((
              .(((              (((((
         ,(((((((*             /(((
          .(((((  ((( (/  //   (((
                 /(((.  /(((((  /(((((
                        .((((/ (/

Usage:
  cn [command]

Available Commands:
  cluster      Interact with a particular Ceph cluster
  s3           Interact with a particular S3 object server
  image        Interact with cn's container image(s)
  version      Print the version of cn
  kube         Outputs cn kubernetes template (cn kube > kube-cn.yml)
  update-check Print cn current and latest version number
  flavors      Interact with flavors
  completion   Generates bash completion scripts

Flags:
  -h, --help   help for cn

Use "cn [command] --help" for more information about a command.开始使用
- 使用工作目录启动程序 /tmp,初始启动会比较久,需要等待一段时间
bash
# ./cn cluster start -d /tmp [cluster]
[root@localhost ~] ./cn cluster start -d /tmp my-first-cluster
Running ceph-nano...
The container image is not present, pulling it.
This operation can take a few minutes......................................................................................................................................................................................................................................................................................................................................................................................................................................................................................................................................................................

Endpoint: http://10.36.116.164:8000
Dashboard: http://10.36.116.164:5001 // 控制面板
Access key is: 9ZU1QBYX13KPLXXDDCY2
Secret key is: nthNG1xb7ta5IDKiJKM8626pQitqsalEo0ta7B9E
Working directory: /usr/share/ceph-nano // 工作目录

# 参数说明:
[root@localhost ~]./cn cluster start -h
Examples:
cn cluster start mycluster
cn cluster start mycluster -f tiny
cn cluster start mycluster --work-dir /tmp
cn cluster start mycluster --image ceph/daemon:latest-luminous
cn cluster start mycluster -b /dev/sdb
cn cluster start mycluster -b /srv/nano -s 20GB


Flags:
  -d, --work-dir string   Directory to work from (default "/usr/share/ceph-nano")
  -i, --image string      USE AT YOUR OWN RISK. Ceph container image to use, format is 'registry/username/image:tag'.
                          The image name could also be an alias coming from the hardcoded values or the configuration file.
                          Use 'image show-aliases' to list all existing aliases. (default "ceph/daemon")
  -b, --data string       Configure Ceph Nano underlying storage with a specific directory or physical block device.
                          Block device support only works on Linux running under 'root', only also directory might need running as 'root' if SeLinux is enabled.
  -s, --size string       Configure Ceph Nano underlying storage size when using a specific directory
  -f, --flavor string     Select the container flavor. Use 'flavors ls' command to list available flavors. (default "default")
--help help for start- 创建bucket
bash
# ./cn s3 mb [cluster] [bucket]
[root@localhost ~]./cn s3 mb my-first-cluster my-bucket
Bucket 's3://my-bucket/' created- 上传文件至bucket
bash
# ./cn s3 put [cluster] [file_path] [bucket]
[root@localhost ~]./cn s3 put my-first-cluster /tmp/test my-bucket
upload: '/tmp/test' -> 's3://my-bucket/test'  [1 of 1]
5925 of 5925 100% in 1s 4.57 kB/s done- 常用命令
./cn cluster ls打印cluster列表
bash
[root@localhost ~]# ./cn cluster ls
+-----------+---------+--------------------+----------------+--------------------------------+--------+
| NAME      | STATUS  | IMAGE              | IMAGE RELEASE  | IMAGE CREATION TIME            | FLAVOR |
+-----------+---------+--------------------+----------------+--------------------------------+--------+
| mycluster | running | ceph/daemon:latest | master-dba849b | 2021-08-16T16:23:04.895173052Z | huge   |
+-----------+---------+--------------------+----------------+--------------------------------+--------+./cn cluster start [cluster]启动cluster
INFO
第一次启动会比较久,需要等待几分钟
可选参数:
bash
-d, --work-dir string   Directory to work from (default "/usr/share/ceph-nano")
-i, --image string      USE AT YOUR OWN RISK. Ceph container image to use, format is 'registry/username/image:tag'.
                        The image name could also be an alias coming from the hardcoded values or the configuration file.
                        Use 'image show-aliases' to list all existing aliases. (default "ceph/daemon")
-b, --data string       Configure Ceph Nano underlying storage with a specific directory or physical block device.
                        Block device support only works on Linux running under 'root', only also directory might need running as 'root' if SeLinux is enabled.
-s, --size string       Configure Ceph Nano underlying storage size when using a specific directory
-f, --flavor string Select the container flavor. Use 'flavors ls' command to list available flavors. (default "default")DANGER
启动cluster报错: Error response from daemon: driver failed programming external connectivity on endpoint ceph-nano-s3-cluster (d0489eb87c3df2036d38e281eef8fd1e0e8ca44e3b8faf446b0543cd5babf59a): Unable to enable DNAT rule: (iptables failed: iptables --wait -t nat -A DOCKER -p tcp -d 0/0 --dport 5000 -j DNAT --to-destination 172.17.0.2:5000 ! -i docker0: iptables: No chain/target/match by that name. (exit status 1)) 可能是防火墙被关闭导致的,使用 [root@localhost ~]# systemctl start firewalld.service 开启防火墙后重试
./cn cluster status [cluster]查看cluster状态
bash
[root@localhost ~]# ./cn cluster status s3-cluster

Endpoint: http://192.168.1.150:8001
Dashboard: http://192.168.1.150:5000
Access key: 2XCQ7FA3Y5G5CNVA15Y9
Secret key: 81BiuYHnKxo0JkQymK32a3tBybnLosBlgznap6fi
Working directory: /usr/share/ceph-nano./cn cluster stop [cluster]停止指定的cluster./cn cluster restart [cluster]重启cluster./cn cluster purge [cluster]删除cluster
DANGER
删除cluster时,会把cluster下所有bucket内的文件删除
s3相关命令:
bash
Usage:
  cn s3 [command]

Available Commands:
  mb          Make bucket
  rb          Remove bucket
  ls          List objects or buckets
  la          List all object in all buckets
  put         Put file into bucket
  get         Get file out of a bucket
  del         Delete file from bucket
  du          Disk usage by buckets
  info        Get various information about Buckets or Files
  cp          Copy object
  mv          Move object
sync Synchronize a directory tree to S3在织信中使用
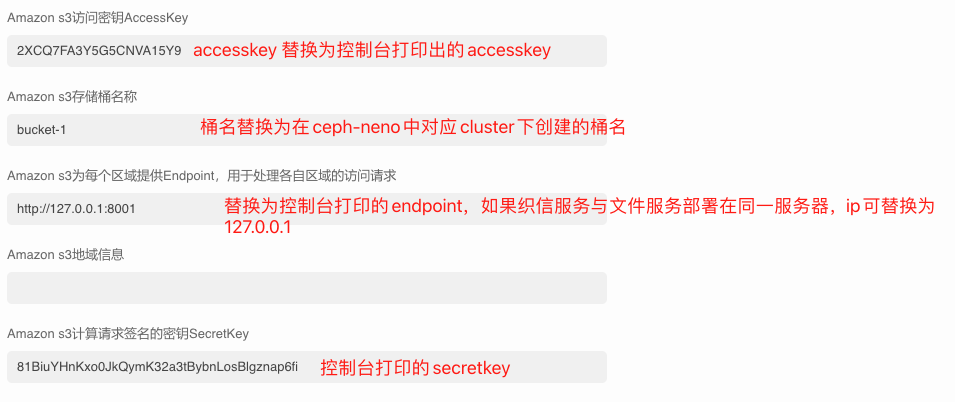
cluster创建后或者执行./cn cluster status [cluster]命令可以查看cluster的配置信息。
例如:
bash
[root@localhost ~]# ./cn cluster status s3-cluster

Endpoint: http://192.168.1.150:8001
Dashboard: http://192.168.1.150:5000
Access key: 2XCQ7FA3Y5G5CNVA15Y9
Secret key: 81BiuYHnKxo0JkQymK32a3tBybnLosBlgznap6fi
Working directory: /usr/share/ceph-nano在织信的admin中找到文件共享存储
进阶使用:使用ceph-nano创建s3服务器,并在宿主机挂载目录
安装cn
- Linux amd64
bash
[root@localhost ~]curl -L https://github.com/ceph/cn/releases/download/v2.3.1/cn-v2.3.1-linux-amd64 -o cn && chmod +x cn- Linux arm64
bash
[root@localhost ~]curl -L https://github.com/ceph/cn/releases/download/v2.3.1/cn-v2.3.1-linux-arm64 -o cn && chmod +x cn测试安装是否成功
bash
[root@localhost ~]./cn
Ceph Nano - One step S3 in container with Ceph.

                  *(((((((((((((
                (((((((((((((((((((
              ((((((((*     ,(((((((*
             ((((((             ((((((
            *((((,               ,((((/
            ((((,     ((((((/     *((((
            ((((     (((((((((     ((((
            /(((     (((((((((     ((((
             (((.     (((((((     /(((/
              (((                *((((
              .(((              (((((
         ,(((((((*             /(((
          .(((((  ((( (/  //   (((
                 /(((.  /(((((  /(((((
                        .((((/ (/

Usage:
  cn [command]

Available Commands:
  cluster      Interact with a particular Ceph cluster
  s3           Interact with a particular S3 object server
  image        Interact with cn's container image(s)
  version      Print the version of cn
  kube         Outputs cn kubernetes template (cn kube > kube-cn.yml)
  update-check Print cn current and latest version number
  flavors      Interact with flavors
  completion   Generates bash completion scripts

Flags:
  -h, --help   help for cn

Use "cn [command] --help" for more information about a command.创建临时集群
bash
[root@localhost ~]./cn cluster start temp -f hugeINFO
-f参数可以指定集群的资源配置,如cpu数量、内存等 可选参数和配置参考:https://github.com/ceph/cn/blob/master/CONFIGURATION.md
根据临时集群创建新镜像
bash
[root@localhost ~]docker commit ceph-nano-temp ceph-nano清理临时集群
bash
[root@localhost ~]./cn cluster purge temp --yes-i-am-sure使用新镜像启动容器并暴露端口和挂载目录
bash
[root@localhost ~]mkdir -p /data/ceph
[root@localhost ~]docker run -dt --name cn -v /data/ceph:/var/lib/ceph -p 8080:8080 -p 5000:5000 -p 8000:8000 ceph-nano启用 Dashboard
1、禁用 SSL 配置
bash
[root@localhost ~]docker exec cn ceph config set mgr mgr/dashboard/ssl false2、将 mgr/dashboard 的服务器地址设置为 0.0.0.0,使 Dashboard 能够监听所有网络接口上的请求,从而允许外部访问
bash
[root@localhost ~]docker exec cn ceph config set mgr mgr/dashboard/server_addr 0.0.0.03、设置 mgr/dashboard 的端口为 8080
bash
[root@localhost ~]docker exec cn ceph config set mgr mgr/dashboard/server_port 80804、启用 mgr 模块中的 dashboard 模块
bash
[root@localhost ~]docker exec cn ceph mgr module enable dashboard5、设置 Dashboard 登录凭据,用户名和密码都设置为 nano 5.1、在宿主机上创建密码文件
bash
# 创建一个名为 nano_password.txt 的文件,内容为 nano(用户名和密码都设置为 nano)
[root@localhost ~]echo "nano" > /root/nano_password.txt5.2、将文件复制到容器内
bash
[root@localhost ~]docker cp /root/nano_password.txt cn:/tmp/nano_password.txt5.3、设置登录凭据
bash
[root@localhost ~]docker exec cn ceph dashboard set-login-credentials nano -i /tmp/nano_password.txt启用 RGW Dashboard(对象网关)
1、创建一个新的 RGW 用户,用户 ID 为 rgw,显示名称为 rgw,并且将其标记为系统用户
bash
[root@localhost ~]RGW_USER=$(docker exec cn radosgw-admin user create --uid=rgw --display-name=rgw --system)2、提取rgw用户的访问密钥(access_key)和私钥(secret_key)
bash
[root@localhost ~]RGW_ACCESS=$(echo $RGW_USER | awk '{ for (i=1;i<=NF;++i) if ($i ~ /access_key/) { split($(i+1),a,"\""); print a[2] } }')
[root@localhost ~]RGW_SECRET=$(echo $RGW_USER | awk '{ for (i=1;i<=NF;++i) if ($i ~ /secret_key/) { split($(i+1),a,"\""); print a[2] } }')3、创建包含访问密钥的文件并移动到容器中
bash
[root@localhost ~]echo $RGW_ACCESS > /root/rgw_access_key.txt
[root@localhost ~]echo $RGW_SECRET > /root/rgw_secret_key.txt
[root@localhost ~]docker cp /root/rgw_access_key.txt cn:/tmp/rgw_access_key.txt
[root@localhost ~]docker cp /root/rgw_secret_key.txt cn:/tmp/rgw_secret_key.txt4、设置 RGW API 访问密钥
bash
[root@localhost ~]docker exec cn ceph dashboard set-rgw-api-access-key -i /tmp/rgw_access_key.txt
[root@localhost ~]docker exec cn ceph dashboard set-rgw-api-secret-key -i /tmp/rgw_secret_key.txt5、设置其他配置
bash
#设置 RGW API 的主机为 127.0.0.1
[root@localhost ~]docker exec cn ceph dashboard set-rgw-api-host 127.0.0.1
 #设置 RGW API 的端口为 8000
[root@localhost ~]docker exec cn ceph dashboard set-rgw-api-port 8000
#设置为 http 协议
[root@localhost ~]docker exec cn ceph dashboard set-rgw-api-scheme http
 #设置为 rgw
[root@localhost ~]docker exec cn ceph dashboard set-rgw-api-user-id rgw验证 Ceph 配置
bash
[root@localhost ~]docker exec cn ceph config dump
WHO    MASK  LEVEL     OPTION                            VALUE                                     RO
  mgr        advanced  mgr/dashboard/RGW_API_ACCESS_KEY  MH4WJ7A4A5DYK3VD1IKJ                      *
  mgr        advanced  mgr/dashboard/RGW_API_HOST        127.0.0.1                                 *
  mgr        advanced  mgr/dashboard/RGW_API_PORT        8000                                      *
  mgr        advanced  mgr/dashboard/RGW_API_SCHEME      http                                      *
  mgr        advanced  mgr/dashboard/RGW_API_SECRET_KEY  O5Ae7FuTjy3yBmf8yyHvGWDDz4k3odMRggoV05rr  *
  mgr        advanced  mgr/dashboard/RGW_API_USER_ID     rgw                                       *
  mgr        advanced  mgr/dashboard/server_addr         0.0.0.0                                   *
  mgr        advanced  mgr/dashboard/server_port         8080                                      *
mgr advanced mgr/dashboard/ssl false *为 RGW 用户新增 bucket
1、访问 Dashboard 访问地址为:http://服务器IP:8080 2、输入前面设置的用户名和密码,进入控制台
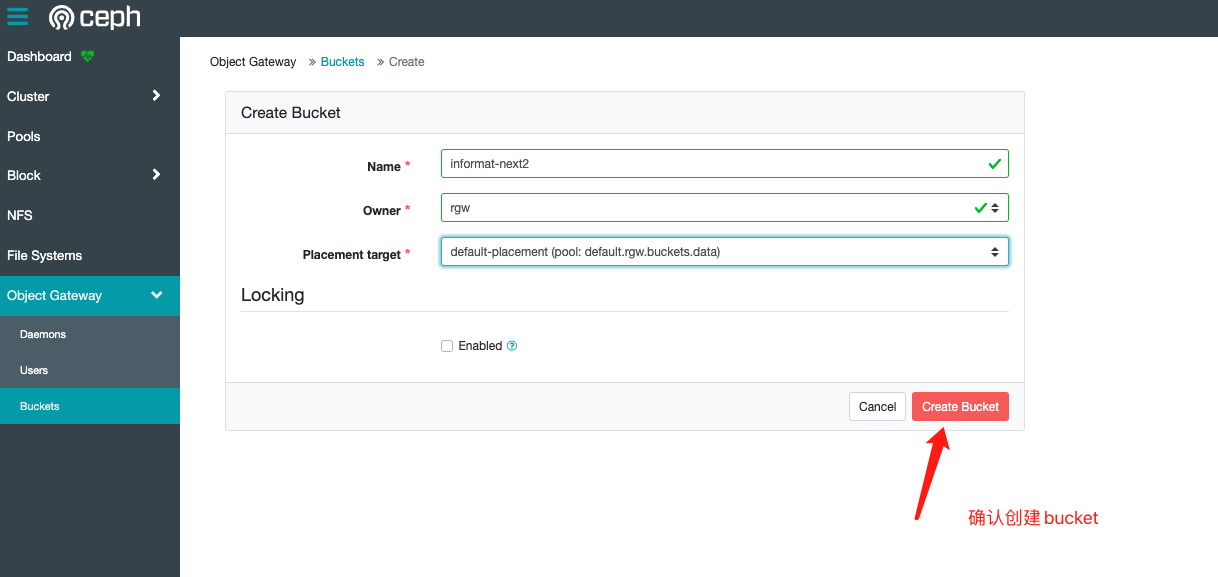
  3、进入 Object Gateway -> Buckets 模块 点击创建按钮,创建 bucket
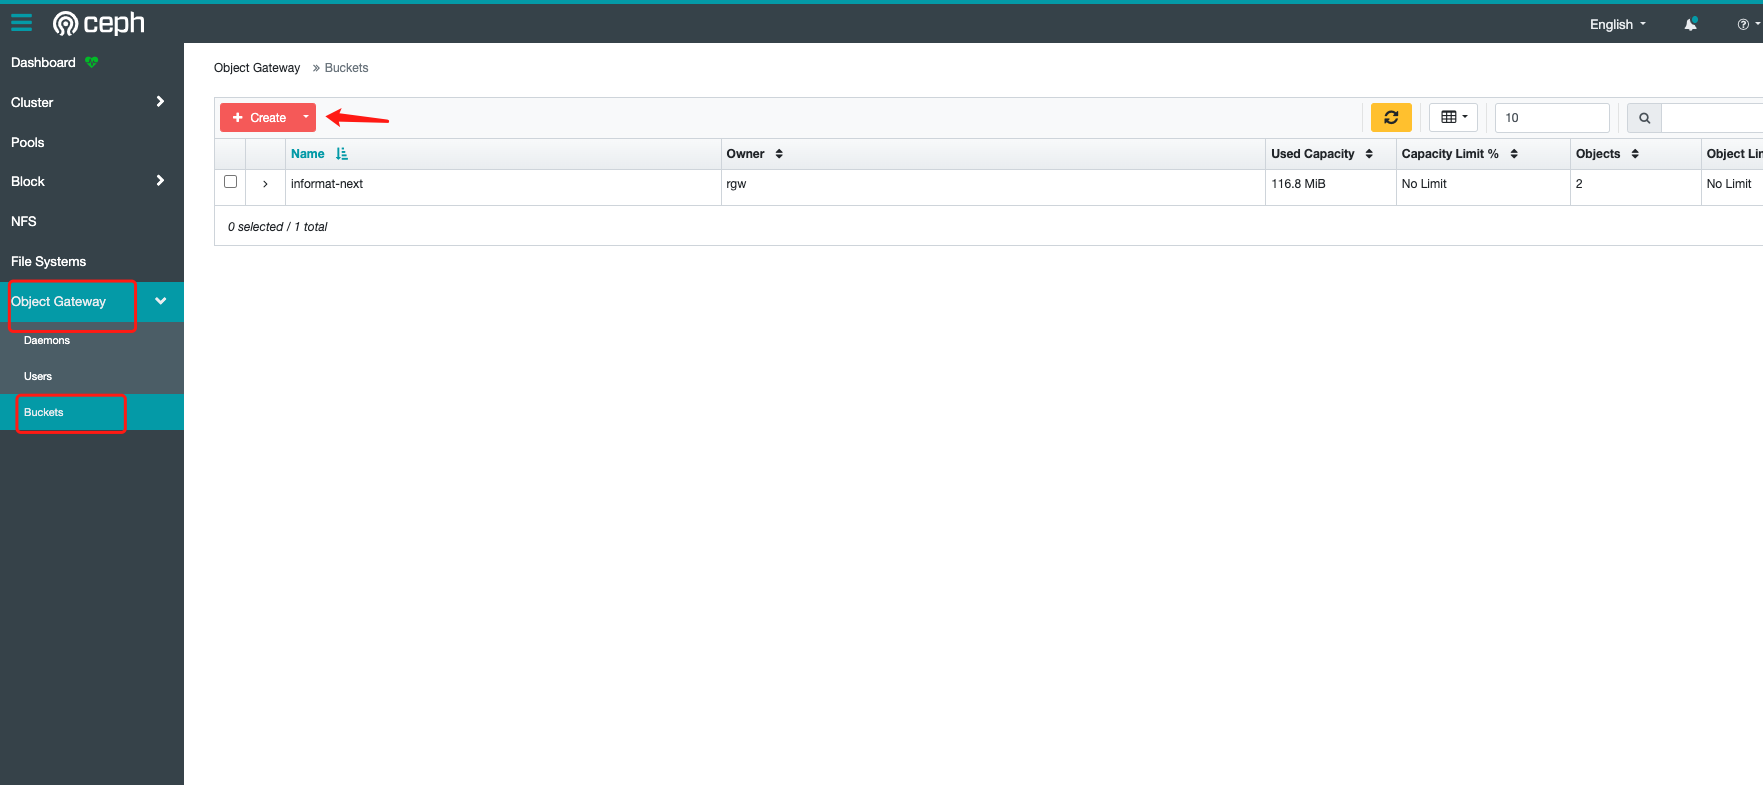
安装docker
以redhat系统为例,安装docker的流程如下:
卸载依赖
在安装之前,需要确保您的系统为redhat8或redhat9
bash
[root@localhost ~]sudo yum remove docker \
                  docker-client \
                  docker-client-latest \
                  docker-common \
                  docker-latest \
                  docker-latest-logrotate \
                  docker-logrotate \
                  docker-engine \
                  podman \
runc设置存储库
bash
[root@localhost ~]sudo yum install -y yum-utils
[root@localhost ~]sudo yum-config-manager --add-repo https://download.docker.com/linux/rhel/docker-ce.repo安装docker
bash
[root@localhost ~]sudo yum install docker-ce docker-ce-cli containerd.io docker-buildx-plugin docker-compose-plugin启动docker
bash
[root@localhost ~]sudo systemctl start docker验证是否成功安装
bash
[root@localhost ~]sudo docker run hello-world此命令下载测试映像并在容器中运行。容器运行时,它会打印一条确认消息并退出。
INFO
更多docker命令参考:https://www.runoob.com/docker/docker-command-manual.html
备份 Ceph 指定 bucket 中的文件
设置 ceph-nano 为本地命令
shell
# 寻找当前 eph-nano 安装目录
$ find / -name "cn"
/root/cn
# 移动
$ mv /root/cn /usr/local/bin/
# 检查是否成功
$ cn
Ceph Nano - One step S3 in container with Ceph.

                  *(((((((((((((
                (((((((((((((((((((
              ((((((((*     ,(((((((*
             ((((((             ((((((
            *((((,               ,((((/
            ((((,     ((((((/     *((((
            ((((     (((((((((     ((((
            /(((     (((((((((     ((((
             (((.     (((((((     /(((/
              (((                *((((
              .(((              (((((
         ,(((((((*             /(((
          .(((((  ((( (/  //   (((
                 /(((.  /(((((  /(((((
                        .((((/ (/

Usage:
  cn [command]

Available Commands:
  cluster      Interact with a particular Ceph cluster
  s3           Interact with a particular S3 object server
  image        Interact with cn's container image(s)
  version      Print the version of cn
  kube         Outputs cn kubernetes template (cn kube > kube-cn.yml)
  update-check Print cn current and latest version number
  flavors      Interact with flavors
  completion   Generates bash completion scripts

Flags:
  -h, --help   help for cn

Use "cn [command] --help" for more information about a command.下载备份脚本
shell
$ curl -L https://repo.informat.cn/downloads/installer/ceph/ceph_nano_backup_binary.sh -o ceph_nano_backup_binary.sh && chmod +x ceph_nano_backup_binary.sh配置参数
shell
$ vim ceph_nano_backup_binary.sh

# 修改配置为自己需要的
CLUSTER_NAME="informat-file"               # Ceph集群名
BUCKET_NAME="informat-next"                # 要备份的Bucket
BACKUP_ROOT="/informat/backup/ceph_data"   # 备份根目录
LOG_FILE="/var/log/ceph_backup.log"        # 日志文件
AWS_CLI_PROFILE="ceph-nano"                # AWS CLI配置名称(不需要改)
DATE=$(date +%Y%m%d)                       # 当前日期格式:20240101
AWS_CLI_URL="https://awscli.amazonaws.com/awscli-exe-linux-x86_64.zip"(不需要改)
AWS_CLI_INSTALL_DIR="/opt/aws-cli" # 二进制安装目录(不需要改)设置定时执行
shell
# 编辑系统级用户的 crontab
$ sudo crontab -e
# 添加定时任务,在打开的定时任务中添加一行。ceph_nano_backup_binary.sh脚本路径为全路径
0 1 * * * /path/to/ceph_nano_backup_binary.sh
# 验证任务是否添加成功
$ crontab -l
0 1 * * * /path/to/ceph_nano_backup_binary.sh0 1 * * * 表示每天凌晨1点执行一次